Reading Hashnode articles on Shell/Terminal
Using Hashnode Public APIs and Python Programming Language

S
Working on mission to provide, Software Engineering Trainings easily and freely accessible to everyone through EdTech
Search for a command to run...
Using Hashnode Public APIs and Python Programming Language
Working on mission to provide, Software Engineering Trainings easily and freely accessible to everyone through EdTech
Thank You Eleftheria Batsou
Catch-all for Port 80 (http://) server { listen 80 default_server; server_name _; return 404; } Catch-all for Port 443 (https://) First generate a self signed cert: openssl req -nodes -x509 -newkey rsa:4096 -keyout self_key.pem -out self_...
WebAssembly (wasm) Designed as a portable compilation target for programming languages Loading…

Since, cloudflare R2 is compatible with S3 API, we can simply use boto3 to work with R2 as wll import logging import boto3 from botocore.exceptions import ClientError from botocore.client import Config def create_presigned_url(bucket_name, object_...
First Thing first sudo add-apt-repository ppa:certbot/certbot sudo apt-get update On Nginx Server sudo apt-get install python3-certbot-nginx sudo certbot --nginx On Apache Server sudo apt-get install python3-certbot-apache sudo certbot --apache Note ...
We will be using python cryptography library install cryptography library using pip install cryptography from cryptography.fernet import Fernet KEY = "" # Fernet compatible key or; # you can generate key using Fernet.generate_key() CIP...
I tried and joined Hashnode couple of months ago and i am really in love with this awesome platform. I was visiting the Hashnode public APIs to create mobile application for https://djangotherightway.com which is hosted on hashnode as well. Upon visiting and playing with the Hashnode Public APIs i created a mobile application which i am planning to open source soon. But for this article/tutorial i will be using same public APIs to create a simple console based Python script/application to read articles on terminal.
I will be trying to divide up this article into multiple sections so that it will help you understand
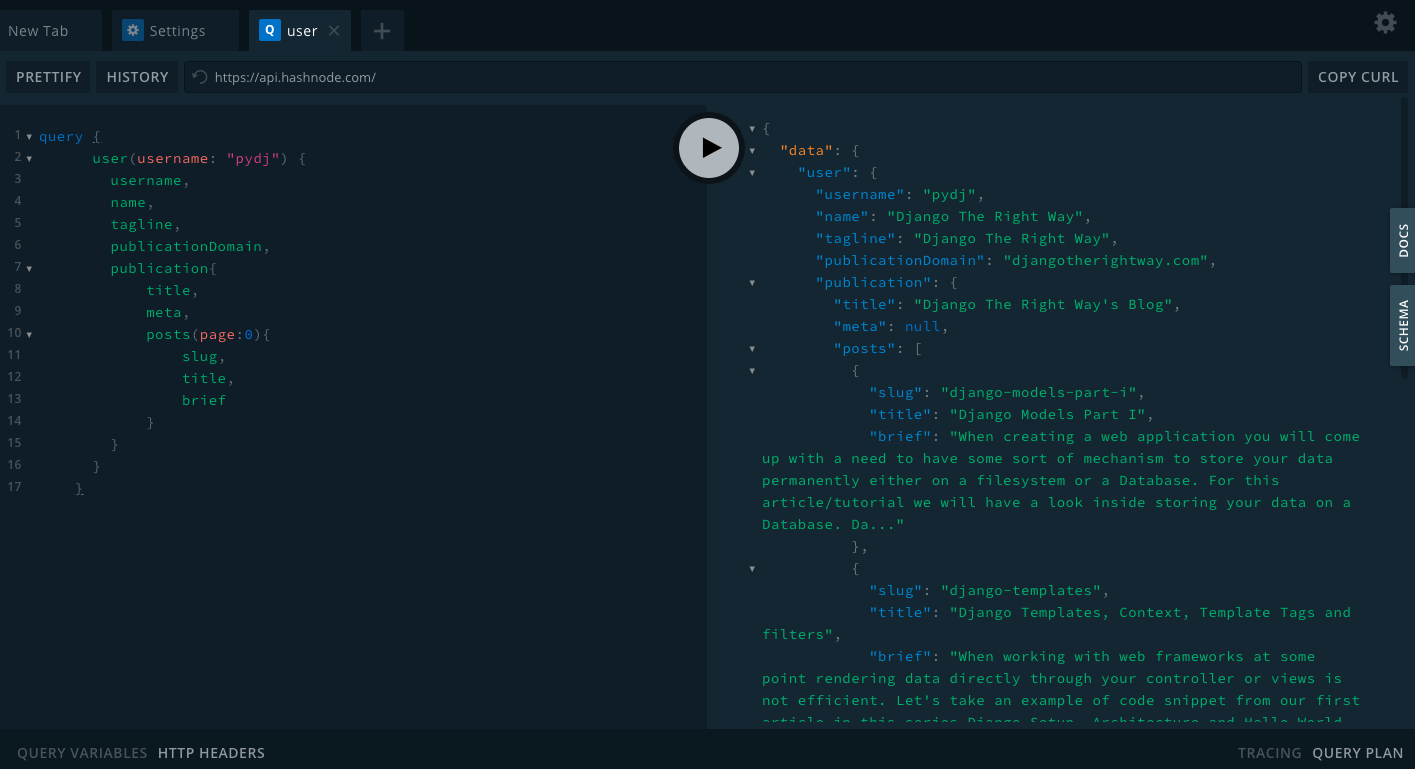
You can find Hashnode Public APIs here at : https://api.hashnode.com/. The best part is it consist of a playground where you can test GraphQL API easily in the browser. Upon playing with the APIs i found two useful APIs useful for our requirement
query {
      user(username: "pydj") {
        username,
        name,
        tagline,
        publicationDomain,
        publication{
            title,
            meta,
            posts(page:0){
                slug,
                title,
                brief
            }
        }
      }
    }
Try this in your browser to see the response:
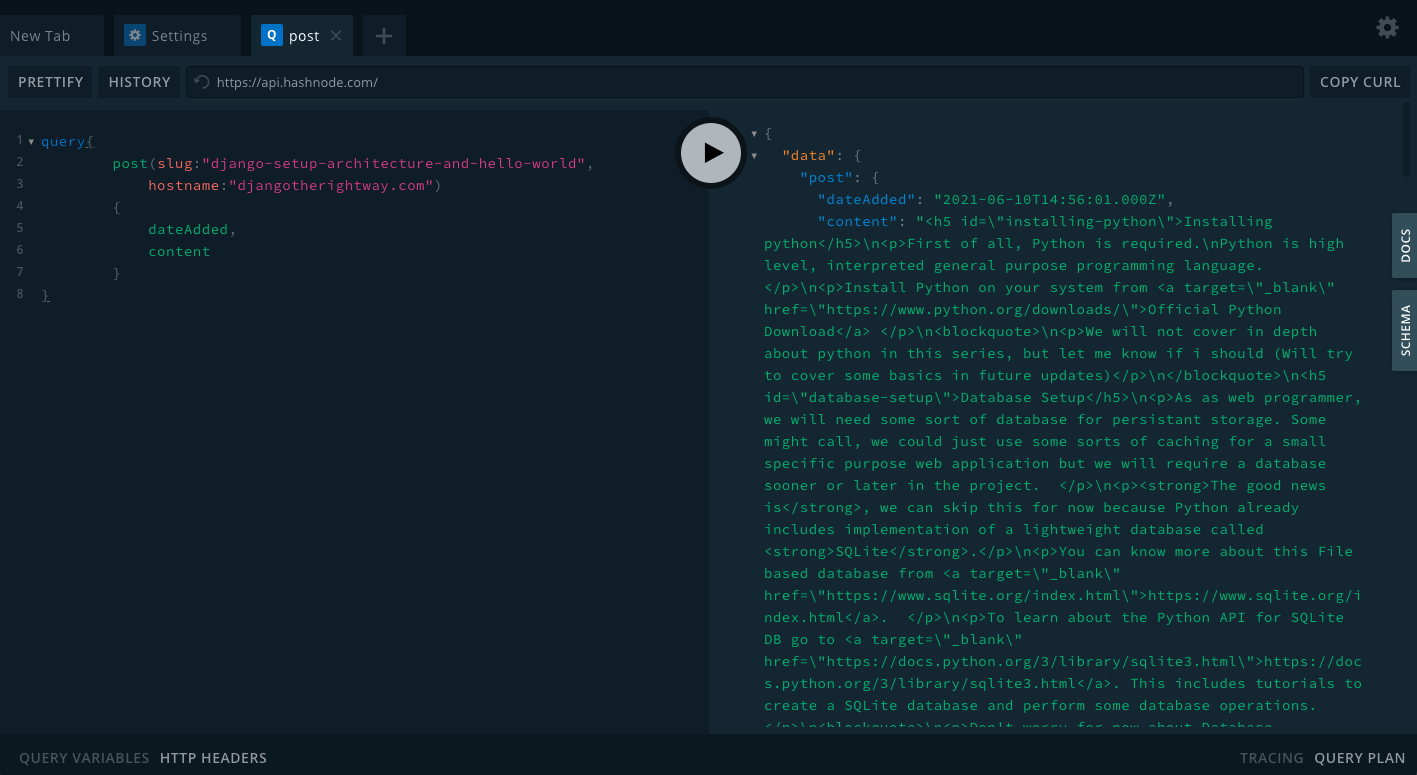
query{
        post(slug:"django-setup-architecture-and-hello-world",
            hostname:"djangotherightway.com")
        {
            dateAdded,
            content
        }
}
Try this in your browser to see the response:
You can always change the query and get more details on the response, but for our requirements the query i just mentioned above would be enough.
First of all, before creating a python file we will use a simple library called requests to query the Hashnode api
Install it using pip.
pip install requests
Learn more about requests library from https://docs.python-requests.org/en/master/
def request_hashnode_dot_com(query):
    return requests.post("https://api.hashnode.com/",
                         json={'query': query})
username and page number. So let's create a python functions which takes username and page as an argumentdef create_query_for_post_list(username, page):
return """{
user(username: "%s") {
username,
name,
tagline,
publicationDomain,
publication{
title,
meta,
posts(page:%d){
slug,
title,
brief
}
}
}
}""" % (username, page)
post slug and hostname. Don't worry, we will get slug and hostname from the Post List API and we will use it heredef create_query_for_post_detail(slug, hostname):
return """{
post(slug:"%s",hostname:"%s"){
dateAdded,
content
}
}""" % (slug, hostname)
def create_plain_text_from_html(html):
    from html.parser import HTMLParser

    class _CustomHTMLParser(HTMLParser):
        normal_text = ""

        def handle_data(self, data):
            self.normal_text += data

    f = _CustomHTMLParser()
    f.feed(html)
    return f.normal_text
We could have used the markdown format of your Post provided by the Hashnode post detail Query, but we used HTML version for simplicity and easy parsing through python internal functions
def show_post_detail(article, publication_domain):
    q = create_query_for_post_detail(
        article['slug'], publication_domain
    )
    post_detail_reponse = request_hashnode_dot_com(q)
    if post_detail_reponse.status_code == 200:
        content = post_detail_reponse.json()['data']['post']['content']
        date_added = post_detail_reponse.json()['data']['post']['dateAdded']
        print(article['title'].upper())
        print("Added on:", date_added)
        print(create_plain_text_from_html(content))
    else:
        print("Error")
        exit(1)


def main():
    import sys
    username = sys.argv[1] if len(sys.argv) == 2 else "pydj"
    current_page = 0
    articles = {}

    while True:
        query = create_query_for_post_list(username, current_page)
        response = request_hashnode_dot_com(query)
        if response.status_code == 200:
            if not response.json()['data']["user"]["username"]:
                print("Invalid User")
                exit(1)
            re_data = response.json()['data']["user"]
            print("Welcome to:", re_data['publication']['title'])
            print("----List of Articles----")
            if not re_data['publication']['posts']:
                print("***No Articles Available, try changing page number***")
            else:
                for index, article in enumerate(re_data['publication']['posts'], 1):
                    articles[index] = article
                    print(f"[{index}]", article['title'])

            print("Current Page:", current_page + 1)
            print("-----------------")
            print(f"Type: n for next page\n"
                  f"      p for previous page\n"
                  f"      1-{len(articles)} for article detail")
            print("-----------------")

            user_input = input("Enter your input: ")

            valid_inputs = ["n", "p"] + [str(i) for i in articles.keys()]
            if user_input not in valid_inputs:
                print("Invalid choice")
                exit(1)
            if user_input == "n":
                current_page += 1
                continue
            if user_input == "p":
                if current_page == 0:
                    print("Cannot go to previous page")
                    exit(1)
                else:
                    current_page -= 1
                    continue

            show_post_detail(articles[int(user_input)], re_data['publicationDomain'])
            break

        else:
            print("error")
            exit(1)
Here to understand python and its ways, i created two functions main and show_post_detail. Actually show_post_detail was not important and on the other hand main function looks so messy and long.
The real thing i wanted to show you on the main function is to make you feel functions and code splits are important because according to my experience in software engineering Code Readability/Reusability is the most important factor, So feel free to play and work around it to make it more readable.
But, here i will try to write some steps that will make you feel easy to understand the messy long main function
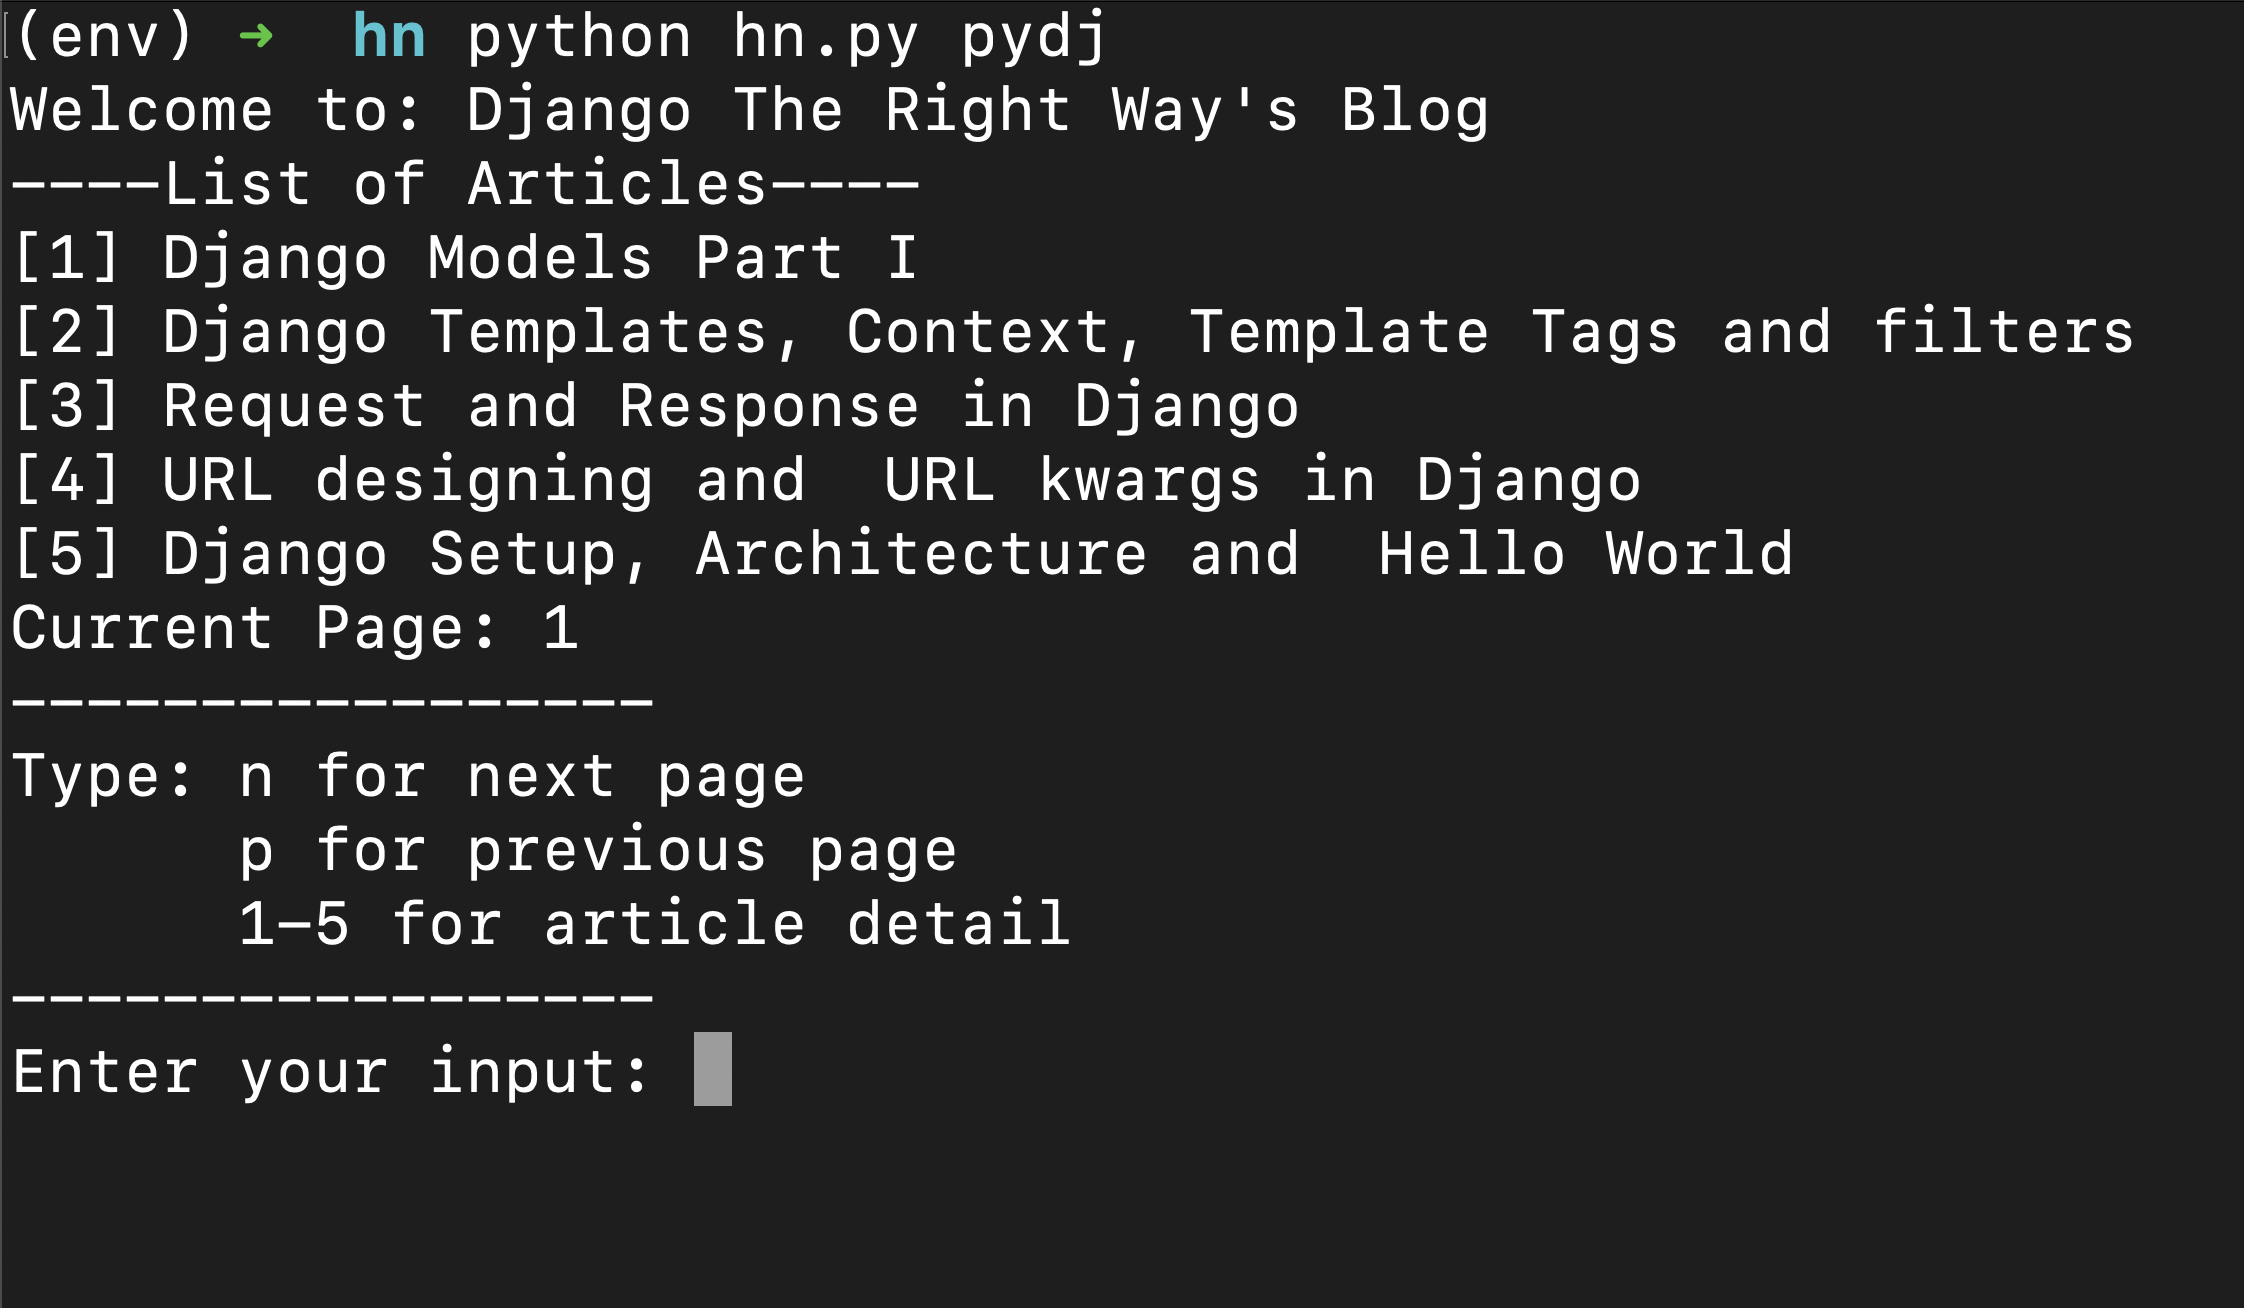
python hn.py pydjusernameTested on
Find the complete source code at: https://github.com/shrawanx/hashnode-terminal